
Attention your failure to read this document and consequent inappropriate use of Gavia out-front mount product may void the 24 months of warranty.
Max Combo kit payload: 120 gr
Max device payload: 170 gr
INSTALLATION
Gavia mounts are specifically designed and suitable only for specific model of handlebars (Roval Rapide). Any other kind of handlebars can’t work and cause breaks or damage to handlebar and mounts.
Tool required before installation:
- round end allen key – 3mm
- carbon grip paste
- antiseize lube

- insert the cilindrical head M4 screw in the hole of carbon body of Gavia mount.
- spread some grip paste on friction shape of th emount (where will be in contact with handlebar) and antiseize lube on the screw.
- install the mount on the handlebar ad tight at max 2Nm – Use the round end of allen key of 3mm
- You can now install the combo kit on the bottom of the Gavia mount if needed. Use the button head screw (V1) or the countersunk head screw (V2). The pin of the Stelvio mount must face the handlebar. Other position doens’t work and screw doens’t match with the insert of the Carbon body.
MAINTENENCE
mount is able to withstand normal use with road bikes and then on the road, gravel. Other uses such as use All-mountain, Free ride and others are not permitted. If you have to clean it, use only a damp cloth. Use of any kind of chemical mixture aren’t suggested and could avoid the warranty.
WARRANTY
The warranty of Stelvio out-front mount is 24 months from date of purchase. The plastic insert is consumable. To misuse (such as crash) or otherwise discordant from the above mentioned indications may void the warranty. We don’t guaranteed any other devices
Attention your failure to read this document and consequent inappropriate use of Stelvio out-front mount product may void the 24 months of warranty.
INSTALLATION
You can install Stelvio v2 out-front mount only with stems with a bolt pitch between 22-36 mm (measured center to center – or 9 mm for Ristretto model). We can’t garantuee if it works with all kind of stems in the market.
Installation it’s fast, replace the stem’s screw (the bottom left), insert the spacer and then the mount. Insert the long black Titanium screw. Before block the mount, adjust it in your centerline position (not needed for Ristretto).

Don’t force tightening, excessive force may break the product and void the warranty. !!
Stay under 5Nm of torque (or read the max tighten torque suggested on your stem). Lube the bolt with anti-seize grease !! !!
!! Before tighten make sure that the titanium screw penetrates into the stem threaded part at least for 6-7 mm. Under this measure thread can fail and could be not safe to ride and cause death !!
MAINTENANCE
Stelvio mount is able to withstand normal use with road bikes and then on the road, gravel. Other uses such as use All-mountain, Free ride and others are not permitted. If you have to clean it, use only a damp cloth. Use of any kind of chemical mixture aren’t suggested and could avoid the warranty.
WARRANTY
The warranty of Stelvio out-front mount is 24 months from date of purchase. The plastic insert is consumable. To misuse (such as crash) or otherwise discordant from the above mentioned indications may void the warranty. We don’t guaranteed any other devices
INSTALLATION
You must install Stelvio x MCFK only with MCFK stems, any other stems is supported.
Installation it’s fast, replace the stem’s screw (the bottom left), insert the spacer and then the mount. Insert the long black Titanium screw.

!! Don’t force tightening, excessive force may break the product and void the warranty !!
!! Keep tighten torque suggested on your stem – 3Nm. Lube the bolt with anti-seize grease !! !!
!! Before tighten make sure that the titanium screw penetrates into the stem for all threaded part. Under this measure thread can fail and could be not safe to ride and cause death. If screws doesn’t achive this measure please contact us !!
MAINTENANCE
Stelvio mount is able to withstand normal use with road bikes and then on the road, gravel. Other uses such as use All-mountain, Free ride and others are not permitted. If you have to clean it, use only a damp cloth. Use of any kind of chemical mixture aren’t suggested and could avoid the warranty.
WARRANTY
The warranty of Stelvio out-front mount is 24 months from date of purchase. The plastic insert is consumable. To misuse (such as crash) or otherwise discordant from the above mentioned indications may void the warranty. We don’t guaranteed any other devices.
Attention your failure to read this document and consequent inappropriate use of Stelvio out-front mount product may void the 24 months of warranty.
INSTALLATION
You must install Stelvio x Extralite Hyperstem only with Hyperstem stems, any other stems is supported.
Installation it’s fast, replace the stem’s screw (the bottom left), insert the spacer and then the mount. Insert the long black Titanium screw.
!! Don’t force tightening, excessive force may break the product and void the warranty !!
!! Keep tighten torque suggested on your stem manufacturer – 3Nm or 2Nm – lube the bolt with anti-seize grease !!
!! Check holes alignement between front clamp & stem. If there is no alignment, the screw can undergo abnormal stresses and could break !!
!! Before tighten make sure that the titanium screw penetrates into the stem for all threaded part. Under this measure thread can fail and could be not safe to ride and cause death. If screws doesn’t achive this measure please contact us !!
MAINTENANCE
Stelvio mount is able to withstand normal use with road bikes and then on the road, gravel. Other uses such as use All-mountain, Free ride and others are not permitted. If you have to clean it, use only a damp cloth. Use of any kind of chemical mixture aren’t suggested and could avoid the warranty.
WARRANTY
The warranty of Stelvio out-front mount is 24 months from date of purchase. The plastic insert is consumable. To misuse (such as crash) or otherwise discordant from the above mentioned indications may void the warranty. We don’t guaranteed any other devices
Attention your failure to read this document and consequent inappropriate use of Stelvio Corretto mount product may void the 24 months of warranty.
INSTALLATION
Stelvio Corretto mount works with some integrated handlebars models. We can’t garantuee if it works with all kind of integrated handlebars on the market. On our website there is all type of handlebar we checked that is compatible.
Installation is easy and fast: replace your handlebar screws with our supplied. If screws included aren’t long enough for your handlebar you can use others but only button head screws. Other type of screws aren’t permitted and can break product during ride.
Stelvio Corretto works with M4 or M5 screws.

!! Before tighten make sure that screws are at the lenght to fit your handlebar thread !!
!! Tighten at max 2 Nm, above this measure the mount could broke on your rides and avoid any kind of warranty !! Lube the bolt with anti-seize grease !!
MAINTENANCE
Stelvio Corretto mount is able to withstand normal use in road bike. Other uses such as all-mountain and free ride aren’t permitted. If you need to clean it, use only a damp cloth. Use any kind of chemical misture aren’t suggested and could void warranty.
WARRANTY
The warranty of Stelvio out-front mount is 24 months from date of purchase. The plastic insert is consumable. To misuse (such as crash) or otherwise discordant from the above mentioned indications may void the warranty. We don’t guaranteed any other devices.
Attention your failure to read this document and consequent inappropriate use of Stelvio out-front mount product may void the 24 months of warranty.
INSTALLATION
Combo kit is available in the DIY version for the mounts produced between the end of 2019 and the end of 2020, from 2021 the C holder is directly glued to the mount so it is not possible to upgrade the product. Combo kit is in no way available for mounts produced between 2017 and 2019. If you have any doubts about your version and compatibility, write us by email.
Attention: the maximum weight allowed is 200 grams. The weight refers to the weight of the GPS device added to the weight of the light or camera. Exceeding this weight can lead to breakage or detachment of the mount itself.
In the package you can find a threaded cap and a 3mm thick washer. Absolutely do not use other washers as they will not have the thickness indicated tightening the screw will break the C holder.

the washer must be inserted in the empty space between the two alts of your cam and the C holder. When the screw is closed, the system must be compact and without spaces so that the screw compacts the whole system, blocking your cam or light.
We suggest using carbon grip grease if you find it difficult to tighten the screw. The grease is to be applied to the face of the threaded cap towards the C holder
Don’t force tightening, excessive force may break the product and void the warranty. !!
Stay under 2.5Nm of torque. Lube the bolt with anti-seize grease !! !!
WARRANTY
The warranty of Stelvio out-front mount is 24 months from date of purchase. To misuse (such as crash) or otherwise discordant from the above mentioned indications may void the warranty. We don’t guaranteed any other devices.
INSTALLATION
Superleggero cages is designed to fit on every bicycle frame with two holes (M5) and a gap of 65 mm (center to center). The cage can fit some little differences of bolt’s distance, but under 2mm of tolerance. Fitting Superleggero with a different measure between bolts void the warranty. Only a bottle of 74 mm of diameter must be used on Superlggero cage. We suggest to use only 500ml bidons. Conic designed bottle can’t have a proper grip in all road situations.

Superleggero is supplied with two titanium screws. Only this type of screws is supported on the cage. Any other screw type mustn’t be used. Carbon leg stopper must be installed under the bottlecage.
Please, take a look at the your frame’s rivets, if it’s not a flat surface, sand it or a washer. A no-flat surface could stress the cage in the screw zone and void warranty..
When removing (or inserting the bottle, don’t force laterally. Insert the bottle parallel as possible to the down tube. Excessive lateral effort can break the product.
Superleggero cage is withstand nomal use with road bikes. Other use like mountainbike is not permitted. If you want to clean it, use only a damp cloth. Use of any kind of chemical mixture aren’t suggested and could release black moisture that can padded on bottles, like whites bottles.
The warranty of Superleggero cage is 24 months from the date of purchase. To misuse (such as a crash) or otherwise a discordant use from above mentioned indications may void the warranty. We dont’ guaranteed any other devices.
INSTALLATION
Superleggero Ti cages cages is designed to fit on every bicycle frame with two holes (M5) and a gap of 65 mm (center to center). The cage can fit some little differences of bolt’s distance, but under 2mm of tolerance. Fitting Superleggero with a different measure between bolts void the warranty. Only a bottle of 74 mm of diameter must be used on Superlggero cage. Conic designed bottle can’t have a proper grip in all road situations.
The Superleggero cage comes with two titanium screws, and only this type of screw is compatible with the cage. Using any other type of screw is not permitted.
When removing or inserting the bottle, do not apply lateral force. Instead, insert the bottle as parallel to the down tube as possible. Excessive lateral pressure can damage the product. The Superleggero cage is designed for normal use with road bikes; it is not suitable for mountain biking or gravel riding.
For cleaning, only use a damp cloth. The use of any chemical cleaners is not recommended, as they can damage the black coating. If you ride on dirty roads, be sure to clean the cage and bottles thoroughly afterward, as micro rocks and sand can scratch and ruin the finish on the interior side of the cage.
The wear on the painted insert side (the part that comes into contact with the bottle) is considered normal over time, similar to any painted or treated metal surface that experiences friction with another object. The lifespan of the coating depends on several factors. For instance, a bottle that is not cleaned regularly and often comes into contact with sand and pebbles can accelerate the removal of paint on the inside. We also suggest to not use metallic bidons.
The warranty for the Superleggero cage is valid for 24 months from the date of purchase. Misuse—such as damage from a crash—or any use that contradicts the instructions above may void the warranty. We do not guarantee any other devices. Intended use of this product is road bike only. The warranty on the paint is valid only if no chemicals have been used, and the product has not been hit, scraped, or involved in any accidents.
INSTALLATION
Only clamp the saddle in the rough zone. The max tightening torques is 8-9 Nm (according with your seat-post’s instructions). Use only 7×9 mm clamping mechanism, other measures are not permitted and could fail the product. Please see the images below and check if the saddle rails are compatible with your seatpost. A 7×10 mm clamping could be perfect for some seatpost.

Look always the road and avoid compression peaks, could lift yourself from the saddle or relieve it !!
Take a look on your clamping system, any kind of screws musn’t touch the saddle body !!
Saddle Adjustment: The saddle is designed to get the first part perfectly horizontal. This is an ideal setup , as we know has its own ride setup. We suggest also to try a -1 or -2 deg of angle .
MAINTENANCE
The saddle is designed and tested for normal road and light gravel use. Other uses such as all mountain or enduro or other use are not permitted. If need to clean the shell of the saddle, we suggest to use only a damp cloth. A use of any kind of chemical mixture isn’t seuggested and could avoid warranty.
WARRANTY
The warranty of Gardena saddle is 24 months from the date of purchase. The warranty is on material and defects. Warranty claims be made on presentation of an invoice of Alpitude ( for website orders) or from an authorized Alpitude dealer. Every claims can be sent to hello(a) alpitude.cc
No warranty claims can be made for improer use or careless trarment, failure comply the product instructions of this manual, removal or modification of the production labels.
Max tighten per each model
1″-1/8 —–> max 4-5 Nm
x Rapide ——-> Max 2,5 Nm
x Ultra Light / Fast ——–> Max 2,5 Nm
Exceed this torque void the warranty and could break the product.
Before installing Deva pulleys wheels, it is recommended to use a new chain. You may need to add at least 1-2 links from the original chain.
Shimano and SRAM models are compatible with 4 custom-made dust covers designed for Shimano and SRAM AXS 12-speed rear derailleurs.
To install the new wheelset, first, remove the chain. Then, unscrew the M4 screws on the upper and lower wheel to remove them. Take out the original wheelset and insert the Deva pulleys along with their dust covers. Install the Deva pulleys using the original screws. Install the new chain and check the alignment of the rear derailleur.
Please note the following:
There are no specific rules for how often you need to maintain these parts. Our sealed bearings are equipped with alloy dust covers, ensuring a longer lifespan. We have designed these parts so that you won’t have to worry about maintenance or technical issues. No lubricants or grease are required for the bearings. While riding, dirt may accumulate between the cover and the bearings, but you can remove it with water or a degreaser. A drop of lubrificant can be applied by time to time on the bearings.
It’s important to note that these are dry bearings, so do not use any lubricant.
- INSTALLATION – IMPORTANT WARNINGS
Before installation, read carefully all this document for a correct installation of our seatpost. Only use compatible components (e.g., round or oval saddle rails as specified by Alpitude).
Do not overtighten: excessive torque may permanently damage both carbon parts and your frame.
STEP 1 – PRE-INSTALLATION
If needed apply a thin, even layer of carbon assembly paste on the clamping area of the seatpost. This paste increases friction, allowing secure clamping at lower torque values and preventing slippage or over-compression. Use anti-seize lube for titanium screws.
Check your torque wrench calibration before use to ensure accurate clamping force.
Respect torque specifications meticulously:
Seatpost clamp (frame interface): 4 Nm (refer to Specialized SL8 specification)
Saddle rail clamp bolts: 3 Nm
STEP 2 – INSERTION
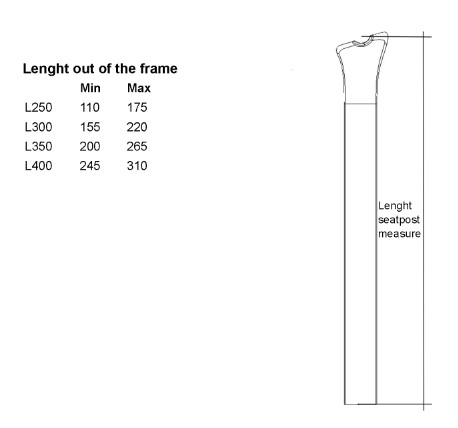
Insert the seatpost into the SL8 frame, respecting the minimum insertion depth (safety line must remain fully inside the frame).
STEP 3 – CLAMPING
Use a torque wrench to tighten the seatpost clamp to the torque recommended by Specialized (usually 4 Nm for SL8).
Do not exceed this value to avoid damage to carbon parts.
SADDLE ADJUSTMENT
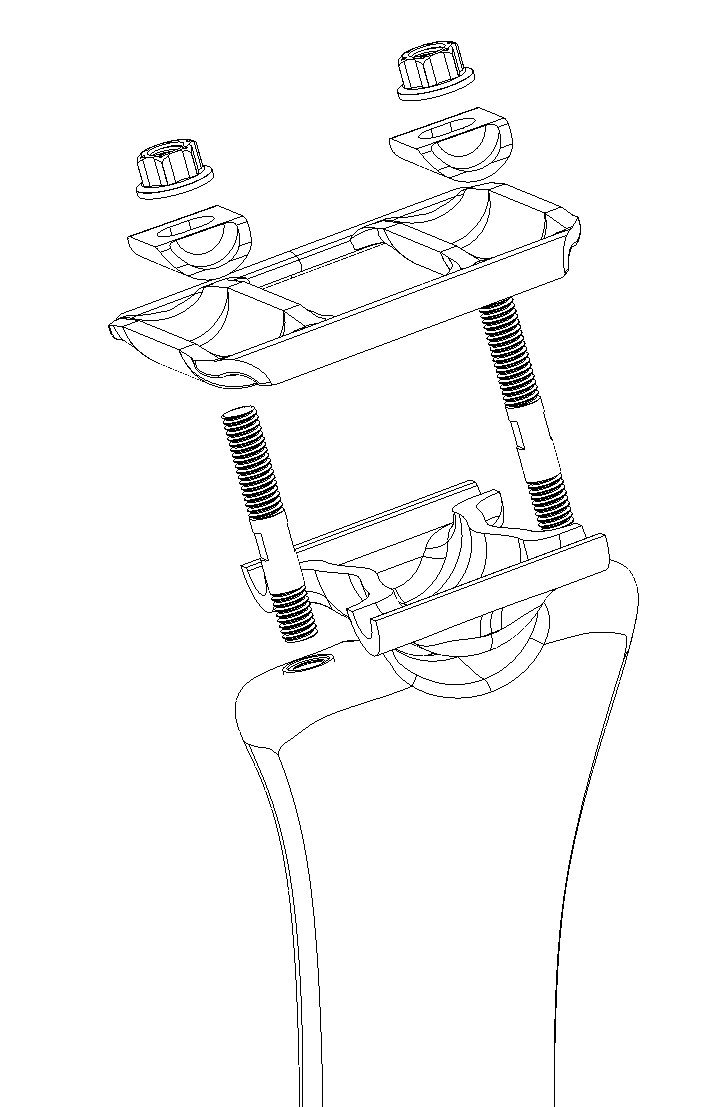
Mount your saddle onto the clamp parts, making sure the rail shape matches the cradles.
Position the saddle to your preferred setback and tilt. Tighten the clamp bolts evenly to 3 Nm using a torque wrench.
IF YOU DON’T HAVE A TORQUE WRENCH COMPATIBLE FOLLOW THIS:
1) assemble all parts with rails in position and close the nuts so the saddle position is achieved.
2) from that nut position: You need to make an initial 1.0 turn on the nut, but do it on both nuts symmetrically so you don’t lose the saddle’s angle. I recommend 0.3 turns on each nut.
3) try to move the saddle by hand, with this shouldn’t move by had, so you can make a very courtyard bike trip to check if the saddle moves, if saddles moves go to point 4)
4) You need to add another half turn to each nut.
MAINTENANCE
RECOMMENDED INTERVAL:
Every 3 months (or every 1–2 months for heavy use)
Checklist:
Check for cracks, delamination, or unusual noises.
Clean the seatpost and frame contact areas thoroughly.
Remove the seatpost and reapply carbon assembly paste.
Verify saddle clamp bolt torque.
Lightly lubricate bolts if specified (do not grease unless recommended).
ADDITIONAL NOTES
Never use conventional grease or lubricants on carbon surfaces.
Do not pressure wash directly onto the seatpost/frame interface.
After impact or crash, have a specialist inspect the seatpost before reuse.
WARRANTY
The warranty of Tonale seatpost is 24 months from date of purchase. . To misuse (such as crash) or otherwise discordant from the above mentioned indications may void the warranty. We don’t guaranteed any other devices.